The new 12" LX200GPS Meade telescope is significantly improved over the 16" LX200 in a number of ways, the most notable is the improvement in the focusing scheme. In addition, the "superwedge" mount makes polar alignment much simpler, and thus the 12" points and tracks with higher precision than the 16". Unfortunately, for the time being, the 12" has to be driven using the "Autostar II" handpaddle instead of a computer. This requires you to become familiar with the features of this paddle, and how to start the telescope up using this paddle. At the dome, the "Instruction Manual" for the Meade GPS series telescopes will be physically attached to this write-up, but I have found it to be only marginally useful, and have summarized the important stuff below (an online version can be found here).
Introduction
Before we get to the start-up procedure, a quick description of the telescope is warranted. As the name (LX200GPS) implies, this telescope has a built-in GPS receiver that allows the telescope to know where it is, and gives it an accurate time source. This telescope also has a built-in magnetometer and can software-correct for any tilt in the leveling of the mount. These features are nice for simply plopping the telescope down in a field, and letting it figure out where it is, to self-level, and to find the direction of North. Except for the time signal, none of these features are useful for a permanently mounted equatorial telescope. Unlike the 16", the 12" GPS telescope does not have an internal battery powered clock as it was designed to use the GPS signal to set the time after power-up. The bad news is that inside a dome, the receiver is unable to lock onto the GPS signal, and therefore the telescope is unable to update the time and date! These will have to be manually set every time you start-up the telescope.
One of the worst features of all of the older Meade telescopes was the focusing mechanism: the primary mirror is moved to change the focus. The mirror slides up and down a tube, and wobbles all over the place. In addition, large "flops" occur which cause radical changes in focus when slewing (or sometimes even while sitting still). Meade has modified the focus system by installing a "lock" on the mirror (see the manual, page 6, circled number 9, and page 7 for the text describing it). Damage can occur if you do not unlock this mechanism before attempting a coarse focus. Included in this design is a new motorized "microfocuser" that allows small, precise motions around the "coarse" focus achieved using the traditional focusing knob. This is a real sea-change, and makes focusing a delightful experience. This should enable the AST110 students and the public to properly focus the telescope for their eyes.
An Introduction to the Autostar II Handpaddle
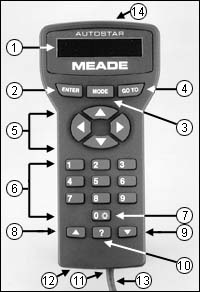
Below is a figure of the handpaddle with the main features numbered. The actual handpaddle on the 12" has extra features for the number keys ("hotkeys") that are not shown here (see Figure 2 of the manual), but that we will cover below. At the top of the handpaddle are the three most important buttons: ENTER, MODE, and GO TO (2, 3, and 4 in the figure, respectively). Below that (labeled with the "5") are your direction keys. Normally, the telescope is used in Alt/Az mode, and these would be Up-Down, and Right-Left. In equatorial mode, the Up button is North, the down button is South, the left button is East, and the right button is West. In addition to moving the telescope, the direction buttons also move you through various numeric and text entering modes that we will discuss later. The next most important buttons are the scroll up and down buttons, numbers 8 and 9, respectively. These are important because you use these buttons to scroll through the various menu options.
The numeric keys themselves are "hotkeys" and have additional functions besides simply allowing you to enter numeric input. For example, the "1" key is also labeled the "Speed" key. Hitting the Speed key allows you to change the slew rates on the E/W & N/S directional buttons. Press the Speed key, and a numeric key from 1 to 9 to change the slew rates (1 is the slowest = sidereal rate, 9 is the fastest = 8o/s). Keys 2, 3, 5, 6, 8, and 9 allow you to access various object catalogues/menus. Key 2 is labeled CALD for the Caldwell catalogue (a catalogue of interesting objects similar to that of the Messier catalogue). Key 3 ("M") is the Messier catalogue, while key 5, "SS", is the solar system object menu, including the Moon, the planets, comets and asteroids. Key 6 ("Star") allows you access to a number of different star catalogues. Key 8 ("IC") gives you instant access to the Index Catalogue for the NGC, while key 9 ("NGC") is the NGC catalogue. For the Caldwell, Messier, IC and NGC catalogues, after hitting the appropriate numeric key, type in the object's catalogue number using the number keys, followed by an ENTER, and then a GO TO, and the telescope will slew to that object (if the telescope has already had its coordinates "synched" on a bright star).
Hitting keys 5 and 6 present you with additional choices. For example, the top level after hitting the Star key is "Named Stars". Below that is the SAO catalogue, the NGC catalogue, the Messier catalogue and so on. The Named Stars level will be used everytime you start the telescope, as it the list of bright stars used to synch the telescope's position. To select a catalogue, simply scroll up or down using the scroll keys, hit ENTER, and then scroll to the object of interest, followed by another ENTER. To slew to that object simply hit GO TO. If you are centered on this object and wish to synch the telescope, hold down the ENTER key for two seconds, and then let go. The LCD screen should read "to synchronize press enter". Press ENTER, and the telescope's coordinate system will be synched (more on this in the start-up procedure).
Keys 4, 7 and 0 perform other functions. Key 4 accesses the Focus Control menu, allowing you to adjust the speed of the microfocuser as well as the focus itself. See page 17 of the manual for full details. Key 7 is the Reticle Control menu, allowing one to adjust the brightness of a reticle eyepiece (if we had one!). Key 0 simply turns on a little red light at the end of the handpaddle (labeled with the 14 in the figure, above) for use as a flashlight.
Then there is the "?" key. This simply lets you access the help manual by scrolling through the large list of help items.
Accessing Additional Features Using the Handpaddle
Now things get more complicated! To access functions that are not available directly as hotkeys, you must sift through various menus. This is also where danger lies---you could accidently reset the telescope into some useless observing mode if you are not careful! Usually, hitting the MODE key many times will get you out of trouble if you get into some place you should not be. After startup, hitting the MODE key a few times will insure you are at the top level of the Autostar II Menu. There are six categories accessible from this level: Object, Event, Guided Tour, Glossary, Utilities, and Setup. The Setup category is where all the dangerous things lie--stay out of here unless absolutely necessary. The other categories have mostly harmless functions. The tree structure of these various categories is shown here (and better in the LX200GPS manual on page 24).

The most useful of these categories is the top one labeled "Object". Here is where you access all of those objects not accessible using one of the hotkeys (as well as all of the objects accessible from the hotkeys). Included in here are the SAO, Hipparcos, Abell, Herschel, Arp, Uppsala, MCG, and GCVS catalogues. There are more than 145,000 objects listed in the set of catalogues accessible from the handpaddle! You can also track terrestrial satellites if so inclined. The "User Objects" option is where you enter in the coordinates for, and slew to, an object that isn't in one of the catalogues.
The "Event" cataegory allows you to determine the times of various events, including the times of sunrise or sunset, moonrise or moonset, etc. The "Guided Tour" category lets you go off on a software-selected tour of the night's best objects, be they planets and/or deep sky objects. Under the Glossary menu you can find definitions of important astronomical terms. The Utilities category has two items of interest: "Brightness Adj." (the handpaddle display brightness control), and the "Park Scope" option that parks the telescope at the intersection of the meridian and celestial equator. The latter should be used at the end of every night to insure that the telescope starts up at this location, especially if one wishes to find objects during the daytime.
The last category is the Setup menu. Stay away from this if at all possible. The only reason to go into this menu is to change the Date or Time if you set them incorrectly at start-up. Align is the most dangerous subcategory, followed by Site. Align really is only useful for Alt/Az applications. Site is where the longitude and latitude of the observatory are stored. The only useful routine in here is the one labeled "High Precision". If this mode is selected, the telescope first slews to a nearby bright star for synching before proceeding to a much fainter galaxy, or other deep sky object.
You now have all the necessary information to use the 12" telescope handpaddle! Now, the start-up routine.
12" LX200GPS Start-up Procedure
1) Open the dome slit, and plug the dome rotation power supply cord into the wall.
2) Plug the telescope tranformer power supply cord into the outlet on the pier.
3) Take the handpaddle out of the holder, and flip the power switch at the base of the telescope to "on". A red light comes on showing power is present, and the paddle beeps and presents a copyright message on the LCD display. The motors quietly whir while the display shows an "Initializing.... Smart Drive" message.
4) The telescope next tries to get a GPS fix, hit the ENTER key three times to abort this effort. This sends you into the time and date entry mode.
5) To enter the time, simply hit the correct numeric keys in the hour and minutes positions. Simply type in the correct time to the nearest minute or two.To scroll to the right when in this mode, use the right directional arrow (the West slew button), to scroll to the left use the left (East) arrow button. Scroll to the right using the right arrow direction key and use a scroll key to toggle the AM/PM to the correct value. When complete hit ENTER.1 The telescope then asks whether daylight savings time is in effect or not, simply toggle it on/off (yes/no) using the scroll keys. Hit ENTER.
6) You are now sent to the date entry screen. Set the day of the month using the numeric keys. Use the right arrow button to move to the month, then use the scroll keys to select the correct month. Move to the year, and use the numeric keys, or the scroll keys, to change the digits on the year (note that the telescope seems to save the Month and Year from one night to the next, so these last two actions may not be necessary). When this is done, hit the ENTER key.
7) The paddle display will now say "Align: One Star. Hit the MODE key several times until the display reads "Select Item: Object". If you accidently hit an ENTER in the Align: One Star configuration, the telescope will attempt to go into an automatic setup mode and start to ***RUN AWAY***. Try to ABORT this by hitting the MODE key several times. If the telescope continues to run away (as it probably will!!), ***Power the Telescope Off***, manually slew the telescope back to a safe orientation by unlocking the RA and Dec locks (see pages 6 and 7 of the manual, numbers 12 and 17 for the location of these locks), and return to step 3.
8) If you have not already done so, remove the dust caps on the finderscope and the main telescope (you might need to slew the telescope to the East or West to reach these).
9) Hit the MODE key a few times to insure you are at the top level (Select Item: Object) menu.
10) Use the slew buttons to move to a bright star whose name you know. Examples are Vega, Altair, Rigel, Sirius, Regulus, Spica, Capella, and Arcturus. Center this bright star in the main telescope eyepiece. Hit the Star button, and then an ENTER to select the "Named Stars" menu. Scroll down through this list of stars until you find your chosen star. Hit ENTER. The display now echoes your choice. Hold the ENTER key down two or three seconds, let up, and the display says "to synchronize telescope hit ENTER". Follow those directions. This synchs the telescope's position, and you are set to observe. (Note that you should be able to synch to any fixed object appearing in one of the Autostar catalogues, but you will have to first know how to find those objects!)
11) Observe by selecting an object of interest using the hotkeys or other catalogue selection. One caveat, however, is to NOT move the dome until the telescope has stopped slewing (the handpaddle will let you know when it is done slewing). When the dome rotation buttons are pushed, there is a large power spike, and this effects the slewing of the telescope. We will need to get a UPS for the telescope power supply to keep this from happening.
12) If not done already, unlock the focus, and adjust until the focus is pretty close. Lock the focus. Now hit the Focus hotkey, select the focus menu, and use the microfocuser to fine tune the focus. Note the microfocuser only has about 1/4" of travel, so you might need to back it off and readjust the coarse focus if you are near one of the travel limits. The motor changes in pitch when these limits are reached (see page 17 of the manual for more).
1Time accuracy: there is no real need to have a super accurate time for observing with the 12". Unlike the 16", there is no requirement to know the altitude and azimuth of the chosen objects so that the dome slit is properly aligned. The only reason to enter in a very accurate time is when you are tracking down fast moving solar system objects. The telescope has to create an updated ephemerides for these objects, and that requires that it knows the time to a higher precision than for fixed targets.
Hints: Much like the Remark control system, the scroll keys can be used like the mouse button to set the numeric digits. Holding either the up or down scroll key when in a numeric input position will cycle throught the various numbers. In addition, for large catalogues (such as getting to Vega in the Named Stars catalogue), you can get to the end of the list quickly by using the "up" scroll key--this will loop to the bottom of the catalogue.
12" LX200GPS Shutdown Procedure
1) Replace the telescope and finderscope dust covers.
2) Park the telescope using the Utilities menu.
3) Turn off the telescope power.
4) Unplug the telescope power supply.
5) Rotate the dome to the South, and close the slit.
6) Unplug the dome rotation power supply.
7) Lock the doors and go home.